Having recently acquired a 200mm Canon L Series Telephoto Lens with UD-glass elements and rear focusing to correct aberrations, I was keen to see how it would perform as a wide field telescope. I was really pleased with the first experimental images that I took using my Canon EOS 300d - an example is shown below:-
NGC7000 - The North America Nebula
This is a cropped version of the original but the field of view was 6.5 degrees wide. This image subsequently won 'Photograph of the Month' in the January 2007 edition of Astronomy Now Magazine!
I felt that this lens would make a fantastic imaging device if I could couple it up to my Starlight Xpress SXVF-H9C CCD camera. Although the smaller sensor would result in a field of view of just 2.6 degrees, this was still 'wide' in comparison with the 0.86 degrees afforded by my 80mm APO Refractor. Additionally, it would now be possible to use other Canon lenses apart from the 200mm telephoto and, for example, my standard 50mm lens would give a field of view of just over 10 degrees!
The SXVF-H9C has a 'T' thread and comes with a Pentax M42 thread adapter ring but unfortunately, I could not buy a Pentax to Canon adapter as the flange to focal plane distance of the Canon is only 44.0mm in comparison with the 45.5mm distance that Pentax use so it would be impossible to focus at infinity - which is the one place I need to be able to focus!
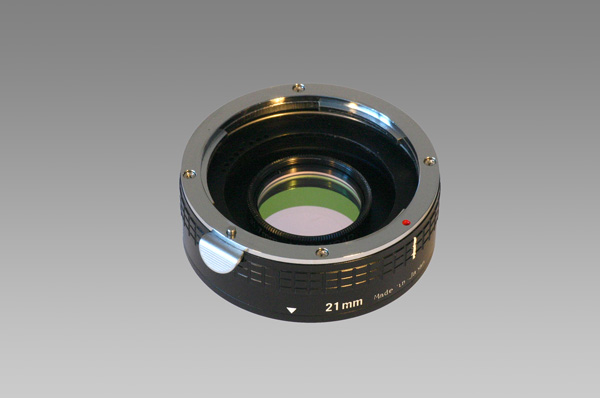
I decided to resolve the issue by designing my own adapter and while I was at it, I allowed for a filter thread to be incorporated within the adapter. I already had a set of Canon extension tubes so I used one of the tubes as the Canon 'female' bayonet part of the adapter and designed the 'T' thread and filter portion to attach to this with the Canon 'male' bayonet portion removed. The following is my original design:-


Male 'T' to Canon Bayonet Adapter
The custom adapter's Canon bayonet end with an IDAS Light Pollution filter installed
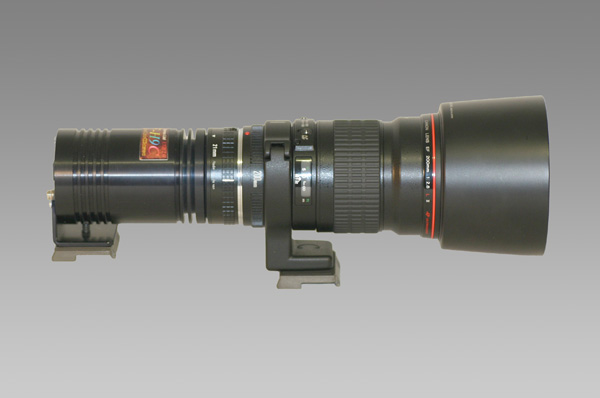
The custom adapter in use coupling the SXVF-H9C CCD and Canon Lens
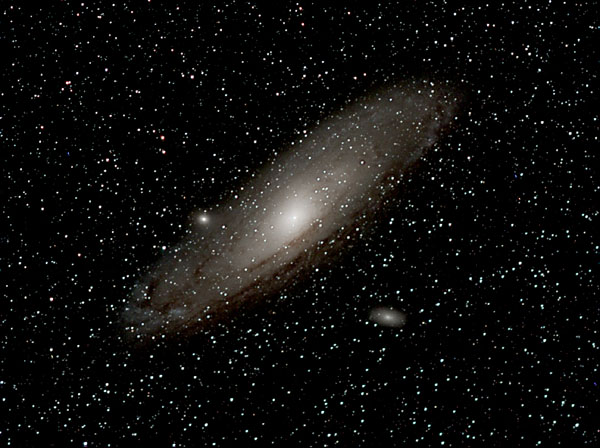
21/09/06 I have now had an opportunity to try the adapter 'in the field' with the SXVF-H9C camera attached and I am pleased to say that is has worked exactly as I had hoped. The following test image of M31 (Andromeda Galaxy) was made up of 11 images of 180 seconds duration stacked in MaximDL. I used an IDAS light pollution filter mounted in the adapter.
M31 - The Andromeda Galaxy
Flushed with the success of the project thus far, I have now designed a second adapter to give me additional flexibility. Sometimes, it is necessary to swap the main imaging camera and the autoguiding camera around so I designed a further Canon bayonet adapter that has a standard 1.25" nosepiece receptacle on it so that it will receive the autoguider camera directly. By making this 'parfocal' with the main imaging camera, I can maintain focus between the two devices when I swap them from one telescope to the other and it is so easy to exchange them - just release the bayonet and re-attached with a simple twist to the other telescope!
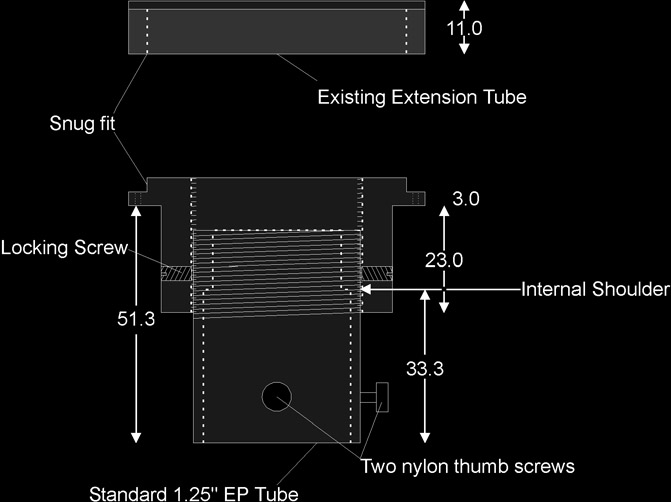
The new adapter has an adjustable screw in nosepiece receptacle with three locking screws which allows me to make minute adjustments to ensure it is parfocal with the main camera adapter.
Custom Canon bayonet to 1.25" eyepiece adapter
The completed adapter showing one of the two EP thumb screws,
one of the three tube locking screws and the bayonet release buttonI now have an amazing amount of flexibility and can connect either my Canon EOS 300D, Starlight Xpress SXVF-H9C CCD or SXV Autoguiding CCD to any of my telescopes or camera lenses with just a twist of the bayonet!
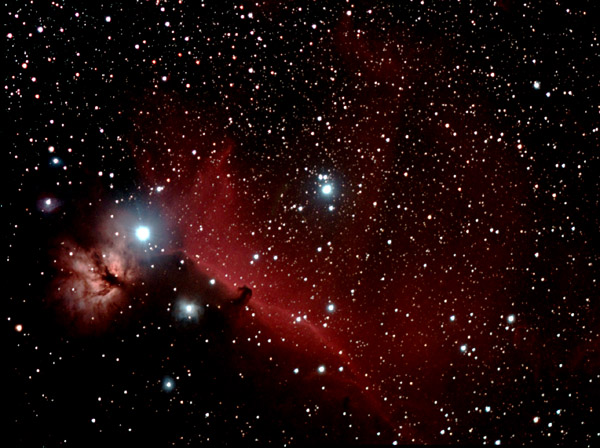
20/12/06 I have wanted to try a wide field image of the Horsehead Nebula for some time and using my special adapter and the 200mm lens gave me just such a field. 26 images of 300 secs. each, stacked in MaximDL with IDAS LP Filter. Guided.:-
The Horsehead Nebula in Orion
10/03/09 I now also use an SXVF-M25C camera and wanted to use this large sensor CCD camera with my Newtonian reflector but I knew that I would suffer from coma that would be quite apparent at the edges of the field of view as I had already noticed this with images taken with the Canon DSLR camera so I bought a Baader MPCC coma corrector, the body of which becomes a 2” nosepiece in use. Like the focal reducer, this is designed to fit at a specific spacing of 55mm from the focal plane of the camera but with the 2” adapter supplied with my reflector, this would have made infinity focus impossible using the coma corrector as the camera would be spaced far too far outwards from the secondary mirror!
This is a common problem with Newtonians and one that is resolved in more expensive ‘astrograph’ designs by changing the position of the secondary mirror so that it intercepts the light cone from the primary mirror further down the tube and additionally by using a low profile focus unit. This change in the light path necessitates the use of an extension tube when using the astrograph as a visual instrument so there is plenty of inwards focus travel available for use with a coma corrector. For my standard Newtonian, I had to design an adapter that resolved several issues.
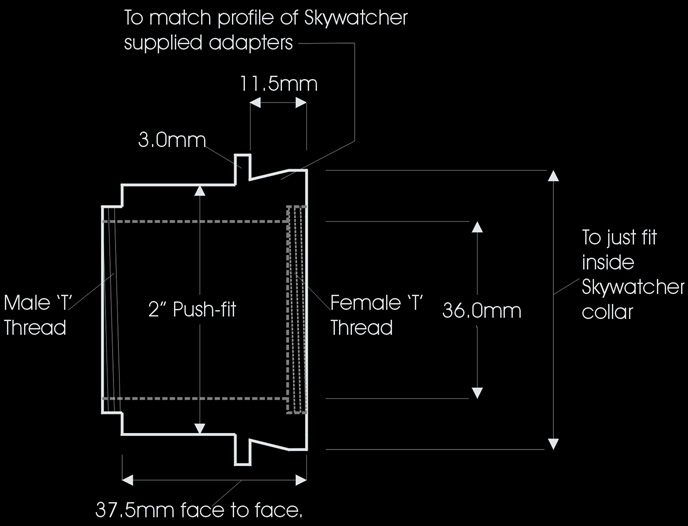
The first part was easy, the adapter had to have a male ‘T’ thread at the camera end and a female ‘T’ thread at the coma corrector end and it had to be 37.5mm from front mounting face to rear mounting face to give the correct spacing of the sensor from the corrector. The difficult part was designing the adapter to fit snugly inside the proprietary focus tube throat’s collar which had a non-standard inside diameter of 57mm and the finished adapter had to be positioned at the right depth within the focus tube to ensure that the system would focus at infinity.
My start point for the design was to measure the focus tube’s extension with the camera attached directly to the focus tube’s ‘T’ thread adapter and focussed at infinity. I then had to build in the extra 37.5mm extension minus the 10mm of extra inwards focus afforded by the optical design of the corrector and ensure that I matched the profile of the standard accessories that fitted the focus tube collar. Having ensured that all the requirements were met, I arranged for the machinist to turn the adapter up for me and I supplied him with the focus tube collar and a matching adapter to ensure a snug fit was achieved.
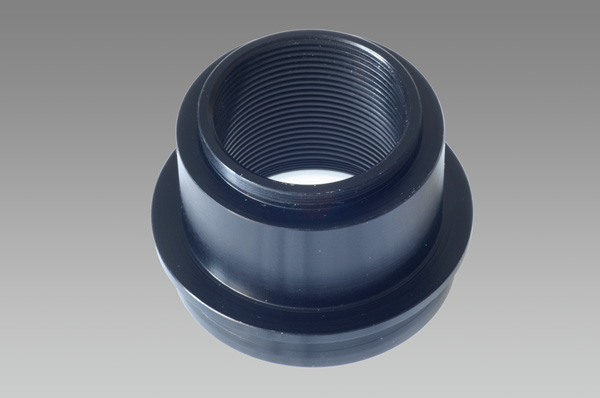
Custom 'T' adapter to fit non-standard Skywatcher focus tube throat
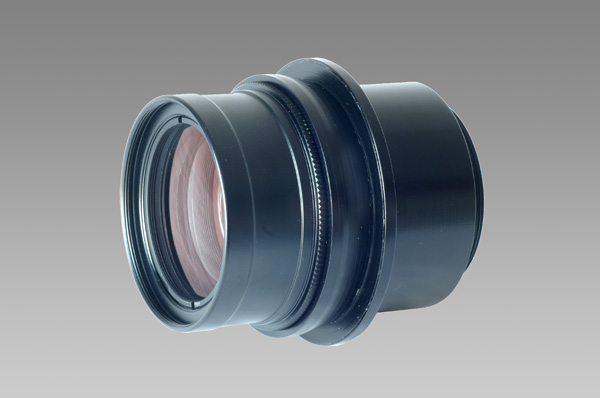
The completed custom Baader Coma Corrector adapter
The completed custom adapter attached to the Baader Coma Corrector